Mycotoxins in poultry – External signs can give a hint
Part 2: Beak/mouth lesions

by Marisabel Caballero and Inge Heinzl, EW Nutrition

The second part of this series will focus on oral lesions as signs of mycotoxin exposure. In this segment, we will delve into the appearance and development of oral lesions, their specific locations based on the type of mycotoxin, and how toxin levels and duration of exposure impact these lesions.

A bit of history: oral lesions in poultry and their association with mycotoxin exposure

Exposure to trichothecenes, a specific group of mycotoxins that includes T-2 toxin and scirpenols- such as monoacetoxyscirpenol (MAS), diacetoxyscirpenol (DAS), and triacetoxyscirpenol, has been associated with oral lesions since the early studies related with mycotoxins:

  • After reports of toxicosis in farm animals, Bamburg’s group (1968) aimed to isolate the toxins produced by Fusarium tricintum, then considered the most toxic fungus found in moldy corn in Wisconsin (USA). Their experiments led to the discovery of the T-2 toxin, named after the strain of F. tricintum from which it was isolated. Today, we know that this fungus was wrongly identified; it was F. sporotrichioides (Marasas et al., 1984). However, the toxin remained known as T-2.
  • Wyatt’s group (1972) already described yellowish-white lesions in the oral cavity of commercial broilers in a case report from 1972. The birds also presented lesions on the feet, shanks, and heads, which raised the possibility of contact with the toxin from the litter.
  • In some of the earliest experimental works regarding T-2 toxin in poultry, Christensen (1972) noted the development of oral necrosis in turkey poults consuming increasing levels of feed invaded by tricintum; also Wyatt (1972) found a linear increase in lesion size and severity with increasing toxin concentrations of T-2 in broilers, starting with 1 ppm. He noted that oral lesions occurred without exception in all birds receiving T-2 toxin.
  • Later, Chi and co-workers (1977) tested what later were considered sub-acute levels of T-2 in broiler chickens, finding oral lesions from 0.4 ppm after 5 to 6 weeks of exposure. At higher levels, the lesions appeared after two weeks. In the same year, Speers’ group (1977) concluded that adult laying hens are more tolerant to T-2 than young chicks and also found that another mycotoxin can produce oral lesions in poultry: monoacetoxyscirpenol (MAS).
  • Fast forward, scientific research continued and the effects of T-2 and scirpenols, either alone or in combinations, on performance and oral lesions in poultry are today well known, as studied by Kubena et al. (1989), Ademoyero & Hamilton (1991), Kubena et al. (1994), Diaz et al. (1994), Brake et al. (2000), Schuhmacher-Wolz et al. (2010), Verma & Swamy (2015), Vaccari (2017), and reviewed by Sokolovic et al. (2008), Minafra et al. (2018), Puvača & Ljubojević Pelić (2023), and Vörösházi et al. (2024).

What are oral lesions and how do they develop?

Bild

Oral lesions caused by feed contaminated by T-2 toxin or scirpenols first occur as yellow plaques that develop into raised yellowish-gray crusts with covered ulcers (Hoerr et al., 1982). They also have been described as white in color and sometimes caseous in nature, as well as round and small, pin-point-sized, or large sheets covering a wider part of the mouth (Wyatt et al., 1972; Ademoyero and Hamilton, 1991).

Under the microscope, the lesions show a fibrinous surface layer and intermediate layers with invaginations full of rods and cocci, suggesting that the surrounding microbiota quickly colonizes the lesion. Inflammation immediately ensues as Wyatt’s team (1972) found the underlying tissues filled with granular leukocytes.

Why do T-2 toxins and other trichothecenes cause such lesions?

T-2 toxin and other trichothecenes are known for their caustic nature (evidenced by studies of Chi and Mirocha, 1978; Marasas et al., 1969), and for incidents involving accidental exposure by laboratory personnel (Bamburg et al., 1968, cited in Wyatt et al., 1972).

Induction of necrosis has been proposed as the main toxicity effect based on in vitro experiments on human skin fibroblast models. The findings were a reduction of ATP production in the cell line together with disruption of mitochondrial DNA (mtDNA) but without an increase in reactive oxygen species (ROS) or activity of caspase-3 and caspase-7, which would be the case for apoptosis (Janik-Karpinsa et al., 2022). A further study (Janik-Karpinsa et al., 2023) found that T-2, on the same cell line, reduced the number of mtDNA copies, damaging several genes and hindering its function; consequently, ATP production is inhibited, and cell necrosis ensues.

Meanwhile, an inflammatory response is triggered, and the lesions are colonized by the surrounding microbial flora (Wyatt et al., 1972). Supporting this notion, Hoerr et al. (1981) observed no mouth lesions after directly administering toxins via crop gavage. Enterohepatic recirculation, facilitating the return of toxins to the oral cavity through saliva, can amplify their toxic effects (Leeson et al., 1995).

Oral lesions depend on…

…the toxin

Oral lesions vary depending on the type of toxin involved. The location of lesions is influenced by the specific mycotoxin in the feed. For instance, research by Wyatt et al. (1972) revealed that with T-2 toxin, lesions initially manifest on the hard palate and along the tongue’s margins. Over two weeks, these lesions progress to affect the lingual papillae at the tongue’s root, the underside of the tongue, and the inner side of the lower beak near the midline.

In contrast, Ademoyero and Hamilton (1991) found that scirpenols present a different pattern. A study including 4 mycotoxins at 5 different levels found, after three weeks of exposure, that the lesions caused by triacetoxyscirpenol (TAS) predominantly occurred in the angles of the mouth (53% of the birds in the study), sparing the tongue. On the other hand, diacetoxyscirpenol (DAS) primarily induces lesions inside the upper beak (shown 47% of the broilers), followed by the inside of the lower beak (in 32% of the birds). The lesion distribution for scirpentriol mirrors that of TAS, while monoacetoxyscirpenol (MAS) resembles DAS in its impact.

Chi and Mirocha (1978) conducted a comparative analysis of lesions caused by T-2 toxin and DAS (both 5 ppm). They observed that the severity of DAS-induced lesions was higher, leading to difficulties in mouth closure for some chicks due to encrustations in the mouth angles.

…the contamination level

Different findings regarding the dose dependency of the lesions are available. Wyatt et al. (1972) (Figure 1) showed a relationship between the lesion size and the toxin level. A clear relationship between the severity and incidence of lesions and the amount of T-2 toxin was also demonstrated by Chi et al. (1977) and Speers et al. (1976). This linear relationship in the case of T-2 toxin could be confirmed for the scirpenols TAS, STO, MAS, and DAS by Ademoyero and Hamilton (1991). They demonstrated a distinct dose-response relationship in a trial with the scirpenols STO, TAS (at 5 levels between 0-8 µg/g), MAS, and DAS (at 5 levels between 0-4 µg/g).

Figure 1: Effect of the inclusion rate of T-2 on the lesion size (Wyatt et al., 1972)


Sklan et al. (2001) tested T-2 toxin at more likely levels (0, 110, 530, and 1,050 ppb) in male chickens and found lesions in 90% of the chickens fed 500 ppb T-2 and in 100% of the ones fed 1,000 ppb of T-2 after 10 to 15 days; the higher dosage provoked the lesions of higher severity. When feeding 100 ppb of T-2, mild lesions appeared in 40% of the chickens after 25 and 35 days. Another group led by Sklan (2003) studied four groups of 12 one-day-old male turkey poults fed mash diets with 0 (control), 241, 485, or 982 ppb T-2 toxin for 32/33 days. Feed intake and feed efficiency were not affected, but oral lesions were apparent on day 7. The severity of the lesions plateaued after 7–15 days, and the lesion score was dose-related (see Figure 2). In the same trial, they also tested DAS (0, 223, 429, or 860 ppb) and found a similar dose relationship.

FigureFigure 2: Lesion scores in poults fed T-2 toxin at different inclusion rates and lengths of exposure (Sklan et al., 2003)

A different result is found in the trial conducted by Hoerr et al. (1982), who observed lesions 2-4 days after initiating toxin exposure (T-2 toxin and DAS; 4 and 16 ppm for 21 days) and comparable lesions when feeding 50, 100, or 300 ppm of the same toxins for 7 days. They asserted that the toxin concentration did not influence the time to onset of lesions nor their severity. Most research, however, shows a clear dose-response relation.

…the duration of exposure

On one hand, chronic exposure to low levels of toxins often requires a specific duration before noticeable effects emerge. And on the other hand, symptoms may also diminish due to hormesis, an adaptive response of the organism to moderate, intermittent stress.

With high toxin levels, lesions appear very soon after exposure. For example, Diaz et al. (1994) exposed hens to a diet containing 2 mg DAS/kg feed, finding lesions in 40% of the birds after only 48 h of exposure. Chi and Mirocha (1978) noted lesions after five days with a T-2 level of 5 ppm. At a comparable level (4 ppm), Chi et al. (1977) reported lesions emerging in the second week of exposure, with nearly 75% of chicks experiencing oral lesions by the third week. Sklan et al. (2003) saw lesions already on day 7 when feeding T-2 toxin or DAS at 1 ppm.

When testing lower levels (200 ppb), Sklan et al. (2001) found lesions after 10 days. They became more severe after 15 to 20 days and then, their severity decreased. Hoerr et al. (1982) also confirmed this by reporting that the number and size of the lesions increased until day 14 but decreased thereafter. Both studies confirm the phenomenon of hormesis.

… animal factors

In general, lesions appear with lower levels of toxins in broilers compared with layers and in layers compared with breeders. Turkeys are also less sensitive than broilers (Puvača & Ljubojević Pelić (2023).

Age also has an influence: young birds usually still have a maturing immune system, and the detoxification processes might not be entirely in place. However, their feed intake is lower and for this reason, in studies like Wang and Hogan (2019), higher impact of mycotoxins is found in older chicks.

Furthermore, additional stress factors influence the impact of mycotoxins in animals. Stress factors are cumulative and, when different factors concur, the severity of mycotoxin effects can increase.

Are oral lesions key indicators for implementing effective toxin risk management?

Oral lesions are painful for the animals, distract them from eating, and deteriorate growth performance. Often they are related with mycotoxins; however, when they appear, an investigation of different factors should take place, including mycotoxin analysis, as oral lesions may have other causes. Some of the known causes of oral lesions in poultry are also very fine feed particle size, deficiency of Vitamins A, E, B6 and Biotin, excessive levels of copper sulphate, and some parasite infections.

This article aimed to help with the differential diagnosis by providing a summary of the knowledge we have about the type and shape of the lesions related to mycotoxin contamination, which can help on a differential diagnosis. Checking the feed for mycotoxins and implementing effective toxin management helps prevent their negative effects, keeps the animals healthy, and contributes to animal welfare and, consequently, performance.


References

Ademoyero, Adedamola A., and Pat B. Hamilton. “Mouth Lesions in Broiler Chickens Caused by Scirpenol Mycotoxins.” Poultry Science 70, no. 10 (October 1991): 2082–89. https://doi.org/10.3382/ps.0702082.

Bamburg, J.R., N.V. Riggs, and F.M. Strong. “The Structures of Toxins from Two Strains of Fusarium Tricinctum.” Tetrahedron 24, no. 8 (January 1968): 3329–36. https://doi.org/10.1016/s0040-4020(01)92631-6.

Bamburg, J.R., N.V. Riggs, and F.M. Strong. “The Structures of Toxins from Two Strains of Fusarium Tricinctum.” Tetrahedron 24, no. 8 (January 1968): 3329–36. https://doi.org/10.1016/s0040-4020(01)92631-6.

Brake, J., P.B. Hamilton, and R.S. Kittrell. “Effects of the Trichothecene Mycotoxin Diacetoxyscirpenol on Feed Consumption, Body Weight, and Oral Lesions of Broiler Breeders.” Poultry Science 79, no. 6 (June 2000): 856–63. https://doi.org/10.1093/ps/79.6.856.

Chi, M.S., and C.J. Mirocha. “Necrotic Oral Lesions in Chickens Fed Diacetoxyscirpenol, T—2 Toxin, and Crotocin.” Poultry Science 57, no. 3 (May 1978): 807–8. https://doi.org/10.3382/ps.0570807.

Chi, M.S., C.J. Mirocha, H.J. Kurtz, G. Weaver, F. Bates, and W. Shimoda. “Subacute Toxicity of T-2 Toxin in Broiler Chicks ,.” Poultry Science 56, no. 1 (January 1977): 306–13. https://doi.org/10.3382/ps.0560306.

Christensen, C. M., R. A. Meronuck, G. H. Nelson, and J. C. Behrens. “Effects on Turkey Poults of Rations Containing Corn Invaded by            Fusarium Tricinctum            (CDA.) Sny. & Hans.” Applied Microbiology 23, no. 1 (January 1972): 177–79. https://doi.org/10.1128/am.23.1.177-179.1972.

Diaz, G. J., E. J. Squires, R. J. Julian, and H. J. Boermans. “Individual and Combined Effects of T‐2 Toxin and Das in Laying Hens.” British Poultry Science 35, no. 3 (July 1994): 393–405. https://doi.org/10.1080/00071669408417704.

European Food Safety Authority. “Scientific Opinion on the Risks for Animal and Public Health Related to the Presence of T-2 and HT-2 Toxin in Food and feed1EFSA Panel on Contaminants in the Food Chain (CONTAM).” European Food Safety Authority, 2011. https://www.efsa.europa.eu/en/efsajournal/pub/2481.

Hoerr, F, W Carlton, B Yagen, and A Joffe. “Mycotoxicosis Caused by Either T-2 Toxin or Diacetoxyscirpenol in the Diet of Broiler Chickens.” Fundamental and Applied Toxicology 2, no. 3 (May 1982): 121–24. https://doi.org/10.1016/s0272-0590(82)80092-4.

Hoerr, F. J., W. W. Carlton, and B. Yagen. “Mycotoxicosis Caused by a Single Dose of T-2 Toxin or Diacetoxyscirpenol in Broiler Chickens.” Veterinary Pathology 18, no. 5 (September 1981): 652–64. https://doi.org/10.1177/030098588101800510.

Janik-Karpinska, Edyta, Michal Ceremuga, Magdalena Wieckowska, Monika Szyposzynska, Marcin Niemcewicz, Ewelina Synowiec, Tomasz Sliwinski, and Michal Bijak. “Direct T-2 Toxicity on Human Skin—Fibroblast HS68 Cell Line—in Vitro Study.” International Journal of Molecular Sciences 23, no. 9 (April 29, 2022): 4929. https://doi.org/10.3390/ijms23094929.

Janik-Karpinska, Edyta, Michal Ceremuga, Marcin Niemcewicz, Ewelina Synowiec, Tomasz Sliwiński, and Michal Bijak. “Mitochondrial Damage Induced by T-2 Mycotoxin on Human Skin—Fibroblast HS68 Cell Line.” Molecules 28, no. 5 (March 6, 2023): 2408. https://doi.org/10.3390/molecules28052408.

Kubena, L.F., R.B. Harvey, T.S. Edrington, and G.E. Rottinghaus. “Influence of Ochratoxin A and Diacetoxyscirpenol Singly and in Combination on Broiler Chickens.” Poultry Science 73, no. 3 (March 1994): 408–15. https://doi.org/10.3382/ps.0730408.

Kubena, L.F., R.B. Harvey, W.E. Huff, D.E. Corrier, T.D. Phillips, and G.E. Rottinghaus. “Influence of Ochratoxin A and T-2 Toxin Singly and in Combination on Broiler Chickens.” Poultry Science 68, no. 7 (July 1989): 867–72. https://doi.org/10.3382/ps.0680867.

Leeson, Steven, Gonzalo J. Diaz, and John D. Summers. Poultry metabolic disorders and Mycotoxins. University Books, 1995.

Marasas, W.F.O., J.R. Bamburg, E.B. Smalley, F.M. Strong, W.L. Ragland, and P.E. Degurse. “Toxic Effects on Trout, Rats, and Mice of T-2 Toxin Produced by the Fungus Fusarium Tricinctum (Cd.) Snyd. Et Hans.” Toxicology and Applied Pharmacology 15, no. 2 (September 1969): 471–82. https://doi.org/10.1016/0041-008x(69)90045-3.

Minafra, Cibele, Denise Russi Rodrigues, Isabel Cristina Mores Vaccari, Vinícius Duarte, Fabiana Ramos dos Santos, Weslane Justina da Silva, Alison Batista Vieira Silva Gouveia, Lorrayne Moraes de Paulo, Janaina Borges dos Santos, and Júlia Marixara Souza Silva. “Oral Lesions in Broilers Caused by Corn Mycotoxins: Review – Original: Lesões Orais Em Frangos de Corte Provocadas Por Micotoxinas Do Milho: Revisão.” Pubvet 12, no. 07 (July 17, 2018). https://doi.org/10.31533/pubvet.v12n7a134.1-11.

O., Marasas W F, Paul E. Nelson, and T. A. Toussoun. Toxigenic fusarium species, identity and Mycotoxicology. University Park: Pennsylvania State University Press, 1984.

Puvača, Nikola, and Dragana Ljubojević Pelić. “Problems and Mitigation Strategies of Trichothecenes Mycotoxins in Laying Hens Production.” Journal of Agronomy, Technology and Engineering Management (JATEM) 7, no. 2 (April 1, 2024): 1074–87. https://doi.org/10.55817/isad5453.

Riahi, Insaf, Virginie Marquis, Anna Maria Pérez-Vendrell, Joaquim Brufau, Enric Esteve-Garcia, and Antonio J. Ramos. “Effects of Deoxynivalenol-Contaminated Diets on Metabolic and Immunological Parameters in Broiler Chickens.” Animals 11, no. 1 (January 11, 2021): 147. https://doi.org/10.3390/ani11010147.

Schuhmacher-Wolz, Ulrike, Karin Heine, and Klaus Schneider. “Toxicity of HT-2 and T-2 Toxins.” European Food Safety Authority, 2010. https://www.efsa.europa.eu/en/supporting/pub/en-65.

Sklan, D., E. Klipper, A. Friedman, M. Shelly, and B. Makovsky. “The Effect of Chronic Feeding of Diacetoxyscirpenol, T-2 Toxin, and Aflatoxin on Performance, Health, and Antibody Production in Chicks.” Journal of Applied Poultry Research 10, no. 1 (March 2001): 79–85. https://doi.org/10.1093/japr/10.1.79.

Sklan, D., M. Shelly, B. Makovsky, A. Geyra, E. Klipper, and A. Friedman. “The Effect of Chronic Feeding of Diacetoxyscirpenol and T-2 Toxin on Performance, Health, Small Intestinal Physiology and Antibody Production in Turkey Poults.” British Poultry Science 44, no. 1 (March 2003): 46–52. https://doi.org/10.1080/0007166031000085373.

Sokolović, Marijana, Verica Garaj-Vrhovac, and Borka ŠImpraga. “T-2 Toxin: Incidence and Toxicity in Poultry.” Archives of Industrial Hygiene and Toxicology 59, no. 1 (March 1, 2008): 43–52. https://doi.org/10.2478/10004-1254-59-2008-1843.

Speers, G.M., C.J. Mirocha, C.M. Christensen, and J.C. Behrens. “Effects on Laying Hens of Feeding Corn Invaded by Two Species of Fusarium and Pure T-2 Mycotoxin ,.” Poultry Science 56, no. 1 (January 1977): 98–102. https://doi.org/10.3382/ps.0560098.

Verma, Yamini, and Madhu Swamy. “Clinico-Pathological Effect of FeedingFusarium Sporotrichioidesand t-2 Toxin Contaminated Diet in Broiler Chicken.” Indian Journal of Veterinary Pathology 39, no. 1 (2015): 58. https://doi.org/10.5958/0973-970x.2015.00013.9.

Vörösházi, Júlia, Zsuzsanna Neogrády, Gábor Mátis, and Máté Mackei. “Pathological Consequences, Metabolism and Toxic Effects of Trichothecene T-2 Toxin in Poultry.” Poultry Science 103, no. 3 (March 2024): 103471. https://doi.org/10.1016/j.psj.2024.103471.

Wyatt, R. D., B. A. Weeks, P. B. Hamilton, and H. R. Burmeister. “Severe Oral Lesions in Chickens Caused by Ingestion of Dietary Fusariotoxin T-21.” Applied Microbiology 24, no. 2 (1972): 251–57. https://doi.org/10.1128/aem.24.2.251-257.1972.

Wyatt, R. D., J. R. Harris, P. B. Hamilton, and H. R. Burmeister. “Possible Outbreaks of Fusariotoxicosis in Avians.” Avian Diseases 16, no. 5 (October 1972): 1123. https://doi.org/10.2307/1588839.


Consistency in performance: a decisive factor in choosing feed additives

Broiler farm

by Marisabel Caballero, Global Technical Manager, and Madalina Diaconu, Global Manager Gut Health, EW Nutrition

In practical poultry production, multiple stress factors occur simultaneously: nutrition, management, environment, etc.. The effects of these factors are additive, leading to chronic stress, a condition in which animals cannot regain homeostasis and continuously deviate the use of resources to inflammation and restoring the gut barrier-function (Das et al., 2011). As a result, the gut microbiome is altered and oxidative stress ensues (Mishra et al., 2019). In this situation, health and productivity are compromised.

The feed supplied to production animals is designed to help them express their genetic potential. However, some feed components are also continuous inflammatory triggers. Anti-nutritional factors, oxidized lipids, and mycotoxins induce a low-grade inflammatory response (Cardoso Del Pont et al., 2020). Other factors that trigger gut health issues include the environment, management, and pathogens.

Feed interventions have shown to increase productivity and improve gut-related biomarkers, demonstrating a mitigation effect over the challenge factors (Deminicis et al., 2020; Latek et al., 2022).

Meta-analysis of broiler studies shows consistent results

As broilers are continuously challenged during the production period, the effects of an in-feed phytogenic (Ventar D – EW Nutrition GmbH) were extensively researched in broiler meat production. 21 trials in different locations (7 in Europe, 6 in the USA, 4 in Japan, 3 in Middle East, and 2 in India), with different production levels (grouped by EPEF) and challenges were analyzed to establish Ventar D’s benefits for the broiler production industry in terms of performance and sustainability. In all trials, the treatment group consisted of a supplementation of the basal feed with Ventar D at a dose 100 g/ton. The control groups were not supplemented with any gut health improvement feed additive.

Of these 21 trials, 14 had corn/soybean meal-based diets and 7 had high fiber diets (based on wheat and rye, which constituted a challenge as no NSP-enzymes were included). Reused litter (by 12 to 14 flocks, previous to the trial) also was used as a challenge. 18 trials were performed in research facilities and 3 in commercial farms.

Consistency in the results from Ventar D could be demonstrated as 19 out of 21 trials showed an improvement in FCR, lowering 3.4 points on average; 18 /21 trials showed higher body weight, with an average of 64 grams more; and 17 trials showed lower mortality than the control group, averaging 1.19 percentual points of reduction. The phenolic compounds included in Ventar D, such as thymol, possess antioxidant, anti-inflammatory, and antibacterial activities, which account for improving gut health and thus increasing performance in production animals.

The European Poultry Efficiency Factor (EPEF) was used to establish the performance level of each flock. This index is based on the average daily weight gain, mortality, and feed conversion, and takes in consideration the age of the flock at collection, allowing to make comparisons on performance within and between farms.

Of the 21 trials, 10 control groups had an EPEF lower than 375, and were considered of low performance level, in 8 the EPEF was between 375 and 425 and considered of medium performance, and for 3 the performance was considered high having an EPEF of 425 or more.

Ventar D increased performance at all levels (Figure 1). However, the effects were challenge-dependent:
Low performing flocks averaged an 8% increase in EPEF, and high performing flocks increased 4%, indicating that Ventar D can help broilers to overcome challenges commonly found in poultry production, and boost performance even with excellent farm and management conditions. These results concur with a meta-analysis by Valle Polycarpo and collaborators (2022), finding that a microbial challenge can influence the performance of phytogenic feed additives.

Percentage Improvement
Figure 1: % of improvement in EPEF, body weight (BW) and Feed Conversion Rate (FCR) against a non-suplemented control group of IFI suplemented flocks with low (<400), mid (400 – 450) and high (>450) EPEF levels. Significant differences (p<0.05) against a control group (not shown as the improvements against it are depicted) are indicated by (*).


Overall, this analysis demonstrates that effective nutritional interventions can give consistent results and constitute effective tools to help production animals overcome stress and enhance productivity.


Mycotoxins in poultry – External signs can give a hint

Part 1: Impact on Feathering

By Dr. Inge Heinzl, Editor, and Marisabel Caballero, Global Technical Manager, EW Nutrition


Mycotoxins are known to decrease health and performance in poultry production. Their modes of action, such as reducing protein synthesis and promoting oxidative stress and apoptosis, lead to cell destruction and lower cell replacement, affecting several organs and tissues.

When different stress factors collude, such as high temperatures and humidity, poor ventilation, high stocking density, and management events, the effects of in-feed mycotoxins can reach a higher level, which may include external signs.

The most common and recognized external sign of mycotoxicosis is mouth lesions caused by trichothecenes, which are highly associated with the presence of T-2 in the feed. However, other signs may appear, such as paleness of combs, shanks, and feet, as well as leg problems, ruffled feathers and poor feather coverage, feed passage, and abnormal feces.

In a series of articles, we want to report on external signs facilitating a differential diagnosis of mycotoxin contamination. This is necessarily followed by feed or raw material mycotoxin analysis and strategies to avoid or mitigate the effects of mycotoxin contamination in poultry production. In the first article, we will cover feathers.

A healthy plumage is crucial for growth and reproduction

Feathering is a crucial aspect of poultry health and productivity. Feathers are essential for thermoregulation, locomotion, adequate skin protection, and reproductive success, protecting hens from injury during mating. Inadequate feathering can lead to lower feed efficiency (Leeson and Walsh, 2004) as well as loss in fertility and chick production (Fisher, 2016). Mycotoxins in poultry feed can compromise feather quality in poultry production animals. This first article delves into the relationship between mycotoxins and poor feathering, exploring different mycotoxins and their mechanisms of action.

In which way do mycotoxins compromise feathering?

On the one hand, chronic mycotoxin exposure impairs the digestive process, hindering the absorption and utilization of vital nutrients essential for feather growth. This disruption can lead to malnutrition, directly impacting the quality and health of feathers. On the other hand, mycotoxins also interfere with metabolic processes critical for feather development, such as keratin synthesis (Wyatt et al., 1975;  Nguansangiam, 2004). Enzymatic pathways involved in synthesizing keratin, the protein building block of feathers, are particularly vulnerable to mycotoxin-induced disruptions. The presence of mycotoxins in feed has been associated with the manifestation of sparse feathering and the sticking out of feathers at an unnatural angle (Emous and Krimpen, 2019). In the case of multiple mycotoxins occurring in the feed, even at singularly unimportant concentrations, a negative impact on feathering is possible. Different mycotoxins have different target organs and consequences for the animal, so their ways of compromising feathering also vary. As feathering needs protein availability, all mycotoxins affecting the protein metabolism or the absorption of nutrients also impact the feathering process. Let us look at the most prominent mycotoxins.

1.   T-2 toxin

Due to climate change, T-2 toxins are on the rise. In the US, more than 50% of the tested samples contained T-2 toxin; in Europe, we found it in 31%, and in China, in 82% of the samples (EW Nutrition, 2024). The highest level was found in Europe, with 850 ppb.

Adverse effects of T-2 toxin in goslings were shown by Gu et al. (2023), who exposed the animals to 6 different levels of T-2 toxin, from 0.2 to 2.0 mg T-2 toxin/kg of feed. The goslings showed a sparse covering with short, dry, rough, curly, and gloss-free feathers on their back with dosages ≥0.8 mg/kg. When zooming on, T-2 can cause necroses of the layer of regenerative cells in the feather base, implying malformation or absence of new feathers, as well as structural damage to existing feathers on the base of the ramus and barb ridges (Hoerr et al. (1982), Leeson et al. (1995)).

The effects in feather regenerative cells are dose-dependent, as confirmed by Hoerr et al. (1982), who applied different doses of T-2 toxin (1.5, 2, 2.5, and 3 mg/kg body weight/day) to 7-day-old broilers for 14 days. Delayed feather development, especially at high dosages, was noticed, as well as malformations and opaque bands in the feathers, the latter probably caused by a segmental reduction in diameter.

Manafi et al. (2015) noticed feather malformations when broiler chickens were challenged with 0.5 ppm T-2 toxin in the feed in combination with an inoculation of 2.4×10⁸ cfu Mycoplasma gallisepticum. When the chickens were challenged only with T-2 toxin, the feathers were ruffled, showing that a coincidence of stress factors even aggravates the symptoms.

2.   Aflatoxins

Aflatoxins, produced by certain Aspergillus species, are among the most notorious mycotoxins. Looking at test results of the last year, Aflatoxin shows incidences between 25 (USA) over 40-65% (Europe, LATAM, MEA, and SEAP) up to 84-88% (China and South Asia) with average levels up to 42 ppb in South Asia (EW Nutrition, 2023). However, more information about the concrete impact of aflatoxins on feathering is needed. They may indirectly affect feathering because they impact digestion and the utilization of nutrients or trace minerals such as zinc, which is essential for the feather construction process. Damage to the liver impacts protein metabolism, and keratin is also necessary for feather production.

In other studies, Muhammad et al. (2017) fed 5 mg AFB1/kg to Arbor Acres broilers, and the birds showed ruffled feathers. A significantly lower feather shine was noticed by Saleemi et al. (2020) when they gave the animals 300 μg AFB1/kg of feed, and the birds of Zafar et al. (2017) showed ruffled, broken, dull, and dirty feathers after six weeks of feeding an aflatoxin-contaminated diet.

3.   Ochratoxin

Ochratoxins, commonly produced by Aspergillus and Penicillium fungi, also pose a significant threat to poultry. When looking at the mycotoxin report, this mycotoxin was found in 16% (Europe) to 70% (SEAP) of the samples (EW Nutrition, 2023). Ochratoxins primarily affect feathering by compromising the structural integrity of feathers and causing delayed feathering in broilers (Leeson, 2021).

Several trials have shown the negative impact of ochratoxin on feather quality. Hassan et al. (2010) fed OTA to laying hens and saw a dose-dependent (dosages from 0 to 10 mg/kg feed) occurrence of ruffled and broken feathers in the OTA group, whereas the plumage of the control group was shiny and well-formed. Hameed et al. (2012) also realized dull feathers when feeding 0.4 and 0.8 mg OTA per kg of feed. A further dose-dependent decrease in feather quality was described by Khan et al. (2023) in broiler chicks. He injected them with dosages from 0.1 to 1.7 mg/kg body weight on day 5 of age and saw a deterioration of feather appearance (rippled feathers) in the groups with the higher dosages of 1.3 and 1.7 mg/kg. Abidin et al. (2016) observed a similar dose-dependent deterioration of the feather quality in white Leghorn cockerels when feeding 1 or 2mg OTA/kg feed.

Combinations of aflatoxins and ochratoxins were also tested. Khan et al. (2017) fed moldy feed naturally containing 56 µg OTA and 136 µg AFB1 per kg to layer hens and saw a deterioration of feather quality with increasing feeding time. Qubih (2017) noticed ruffled feathers when feeding a diet naturally contaminated with 800 ppb of OTA and 100 ppb of AFB1.

4.   Scirpenol mycotoxins

Parkhurst et al. (1992) examined the effects of different scirpenol mycotoxins. After feeding graded levels of fusarium mycotoxins to broiler chicks until three weeks of age, they discovered that the impact of scirpenols stretched across the entire feathered body parts and that the degree of feather alteration is dose-dependent. The main alteration was a frayed or even missing web on the medial side of the outer end of the feather due to poor development of the barbs, barbules, and barbicels, and the tip of the feathers became square instead of rounded—the thinner and weaker shafts of the feathers inclined to show an accentuated medial curve.

Figure Feathering Affected By Scirpenol MycotoxinsParkhurst et al. (1992)

Figure 1: Feathering affected by scirpenol mycotoxins

In their trial, Parkhurst and Hamilton realized that 15-monoacetoxyscirpenol (15-MAS) caused the most severe alterations of feathers, and they determined a minimum effective dose (MED) of 0.5 µg/g diet. The MEDs for 4,15-diacetoxyscirpenol (4,15-DAS) and 3,4,15-triacetoxyscirpenol (TAS) were higher, 2 µg/g and > 8 µg/g, respectively.

How can we enable adequate feathering in poultry?

Adequate feathering of poultry is necessary for the animal’s health and welfare and to ensure fertility and productivity. The occurrence of mycotoxins in the feed – and the probability is high! – can cause poor feathering or the development of malformed feathers.

To best equip broilers, layers, and breeders, their feed must contain all nutrients essential for healthy growth and appropriate feathering. As the risk of contamination of the feed materials is very high (see EW Nutrition’s mycotoxin report 2023), it is of crucial importance to have an efficient mycotoxin risk management in place, which includes sampling, analysis of samples, and the use of mycotoxin binders. EW Nutrition offers MasterRisk, an online tool where farmers and feed millers can feed the results of their feed analysis concerning mycotoxins and get a risk management recommendation.

In the next part of the series, we will report on beak lesions and skin paleness, two other external signs of mycotoxin contamination.

References:

Abidin, Zain ul, Muhammad Zargham Khan, Aisha Khatoon, Muhammad Kashif Saleemi, and Ahrar Khan. “Protective Effects Ofl-Carnitine upon Toxicopathological Alterations Induced by Ochratoxin A in White Leghorn Cockerels.” Toxin Reviews 35, no. 3–4 (August 22, 2016): 157–64. https://doi.org/10.1080/15569543.2016.1219374.

Emous, R. A., and M. M. Krimpen. “Effects of Nutritional Interventions on Feathering of Poultry – a Review.” Poultry Feathers and Skin: The Poultry Integument in Health and Welfare, 2019, 133–50. https://doi.org/10.1079/9781786395115.0133.

Fisher, Colin. “Feathering in Broiler Breeder Females – Aviagen.” https://aviagen.com/, 2016. http://en.aviagen.com/assets/Tech_Center/Broiler_Breeder_Tech_Articles/English/Feathering-in-Broiler-Breeeder-Females-EN-2016.pdf.

Gu, Wang, Qiang Bao, Kaiqi Weng, Jinlu Liu, Shuwen Luo, Jianzhou Chen, Zheng Li, et al. “Effects of T-2 Toxin on Growth Performance, Feather Quality, Tibia Development and Blood Parameters in Yangzhou Goslings.” Poultry Science 102, no. 2 (February 2023): 102382. https://doi.org/10.1016/j.psj.2022.102382.

Hameed, Muhammad  Raza, Muhammad Khan, Ahrar Khan, and Ijaz Javed. “Ochratoxin Induced Pathological Alterations in Broiler Chicks: Effect of Dose and Duration.” Pakistan Veterinary Journal Pakistan Veterinary Journal 8318, no. 2 (December 2012): 2074–7764.

Hassan, Zahoor-Ul, M. Zargham Khan, Ahrar Khan, and Ijaz Javed. “Pathological Responses of White Leghorn Breeder Hens Kept on Ochratoxin A Contaminated Feed.” Pakistan Veterinary Journal 30, no. 2 (2010): 118–23.

Hoerr, F. J., W. W. Carlton, and B. Yagen. “Mycotoxicosis Caused by a Single Dose of T-2 Toxin or Diacetoxyscirpenol in Broiler Chickens.” Veterinary Pathology 18, no. 5 (September 1981): 652–64. https://doi.org/10.1177/030098588101800510.

Hoerr, F.J., W.W. Carlton, B. Yagen, and A.Z. Joffe. “Mycotoxicosis Produced in Broiler Chickens by Multiple Doses of Either T‐2 Toxin or Diacetoxyscirpenol.” Avian Pathology 11, no. 3 (January 1982): 369–83. https://doi.org/10.1080/03079458208436112.

Khan, Ahrar, Muhammad Mustjab Aalim, M. Zargham Khan, M. Kashif Saleemi, Cheng He, M. Noman Naseem, and Aisha Khatoon. “Does Distillery Yeast Sludge Ameliorate Moldy Feed Toxic Effects in White Leghorn Hens?” Toxin Reviews, January 25, 2017, 1–8. https://doi.org/10.1080/15569543.2017.1278707.

Khan, Shahzad Akbar, Eiko N. Itano, Anum Urooj, and Kashif Awan. “Ochratoxin-a Induced Pathological Changes in Broiler Chicks.” Pure and Applied Biology 12, no. 4 (December 10, 2023): 1608–16. https://doi.org/10.19045/bspab.2023.120162.

Leeson, S., and T. Walsh. “Feathering in Commercial Poultry II. Factors Influencing Feather Growth and Feather Loss.” World’s Poultry Science Journal 60, no. 1 (March 1, 2004): 52–63. https://doi.org/10.1079/wps20045.

Leeson, Steve. “Effects of Nutrition on Feathering.” Poultry World, May 22, 2021. https://www.poultryworld.net/specials/effects-of-nutrition-on-feathering/.

Leeson, Steven, Gonzalo J. Diaz Gonzalez, and John D. Summers. Poultry metabolic disorders and Mycotoxins. Guelph, Ontario, Canada: University Books, 1995.

Manafi, M., N. Pirany, M. Noor Ali, M. Hedayati, S. Khalaji, and M. Yari. “Experimental Pathology of T-2 Toxicosis and Mycoplasma Infection on Performance and Hepatic Functions of Broiler Chickens.” Poultry Science 94, no. 7 (July 2015): 1483–92. https://doi.org/10.3382/ps/pev115.

Muhammad, Ishfaq, Xiaoqi Sun, He Wang, Wei Li, Xinghe Wang, Ping Cheng, Sihong Li, Xiuying Zhang, and Sattar Hamid. “Curcumin Successfully Inhibited the Computationally Identified CYP2A6 Enzyme-Mediated Bioactivation of Aflatoxin B1 in Arbor Acres Broiler.” Frontiers in Pharmacology 8 (March 21, 2017). https://doi.org/10.3389/fphar.2017.00143.

Nguansangiam, Sudarat, Subhkij Angsubhakorn, Sutatip Bhamarapravati, and Apichart Suksamrarn. The Southeast Asian J of Tropical Medicine 34, no. 4 (2004): 899–905.

Parkhurst, Carmen R., Pat B. HamiltonON, and Adedamola A. AdemoyeroERO. “Abnormal Feathering of Chicks Caused by Scirpenol Mycotoxins Differing in Degree of Acetylation.” Poultry Science 71, no. 5 (May 1992): 833–37. https://doi.org/10.3382/ps.0710833.

Qubih, T. S. “Relationship between Mycotoxicosis and Calcium during Preproduction Period in Layers.” Iraqi Journal of Veterinary Sciences 26, no. 1 (June 28, 2012): 11–14. https://doi.org/10.33899/ijvs.2012.46888.

Saleemi, M. Kashif, Kamran Ashraf, S. Tehseen Gul, M. Noman Naseem, M. Sohail Sajid, Mashkoor Mohsin, Cheng He, Muhammad Zubair, and Ahrar Khan. “Toxicopathological Effects of Feeding Aflatoxins B1 in Broilers and Its Amelioration with Indigenous Mycotoxin Binder.” Ecotoxicology and Environmental Safety 187 (January 2020): 109712. https://doi.org/10.1016/j.ecoenv.2019.109712.

Wyatt, R.D., P.B. Hamilton, and H.R. Burmeister. “Altered Feathering of Chicks Caused by T-2 Toxin.” Poultry Science 54, no. 4 (July 1975): 1042–45. https://doi.org/10.3382/ps.0541042.

Zafar, Roheena, Farhat Ali Khan, and Muhammad Zahoor. “In Vivo Amelioration of Aflatoxin B1 in Broiler Chicks by Magnetic Carbon Nanocomposite.” Pesquisa Veterinária Brasileira 37, no. 11 (November 2017): 1213–19. https://doi.org/10.1590/s0100-736×2017001100005.


Overcoming Challenges of Xylanase Inhibitors in Animal Feeds

By Dr. Ajay Awati, Global Director Enzymes, EW Nutrition

In recent years, the scientific understanding of xylanase inhibitors (XIs) and their impact on animal nutrition has grown significantly. Xylanase, a crucial enzyme used to enhance nutrient availability in feed, can face challenges from XIs present in cereal grains. This article explores the evolution of plant protection mechanisms, the economic impact of XIs, and the development of a novel xylanase, Axxess XY, resistant to these inhibitors.

Xylanase inhibitors – an evolutionary protection mechanism of plants

Xylanase inhibitors (XI) are a classic example of the evolutionary development of protection mechanisms by cereal plants against pathogens. Microorganisms, such as fungal pathogens, involve the degradation of xylan as one of the mechanisms in pathogenesis (Choquer et al., 2007). There are also other mechanisms by which microorganism-produced xylanases affect plants.

To protect themselves, plants evolved xylanase inhibitors to prevent the activities of xylanases. XIs are plant cell wall proteins broadly distributed in monocots. There are three classes of XIs with different structures and inhibition specificities (Tundo et al., 2022):
1. Triticum aestivum xylanase inhibitors (TAXI)
2. Xylanase inhibitor proteins (XIP), and
3. Thaumatin-like xylanase inhibitors (TLXI).

Xylanase inhibitors have an economic impact

In animal nutrition, xylanases are widely used in diets containing cereal grains and other plant materials to achieve a higher availability of nutrients. The inhibitory activity of XIs prevents this positive effect of the enzymes and, therefore, makes them economically relevant. Studies have reported that higher levels of XIs negatively impact broiler performance. For example, in one of the studies, broilers fed with grains of a cultivar with high inhibitory activity showed a 7% lower weight on day 14 than broilers fed with grains of a cultivar with less inhibitory activity (Madesen et al., 2018). Another study by Ponte et al. (2004) also concluded that durum wheat xylanase inhibitors reduced the activity of exogenous xylanase added to the broiler diets.

Xylanase inhibitors can withstand high temperatures

Even though XIs can impact the performance of exogenous xylanase in different ways, only minor attention was paid to the reduction of xylanase’s susceptibility to xylanase inhibitors during the xylanase development in the last decades. Firstly, the issue was ignored mainly through the assumption that XIs are denatured or destroyed during pelleting processes. However, Smeets et al. (2014) showed that XIs could sustain significant temperature challenges. They demonstrated that after exposing wheat to pelleting temperatures of 80°C, 85°C, 92°C, and 95°C, the recovery of inhibitory activity was still 99%, 100%, 75%, and 54%, respectively. Furthermore, other studies also confirmed that conditioning feed at 70-90°C for 30 sec followed by pelleting had little effect on the XI activity in the tested feed, showing that xylanase inhibitors are very likely present in most xylanase-supplemented feeds fed to animals.

Do we only have the problem of xylanase inhibitors in wheat?

No. After first reports of the presence of xylanase inhibitors in wheat by Debyser et al. (1997, 1999), XIs were also found in other cereal grains (corn, rice, and sorghum, etc.), and their involvement in xylanase inhibition and plant defense has been established by several reports (Tundo et al., 2022).

In most of the countries outside Europe, exogenous xylanase is used not only in wheat but also in corn-based diets. Besides broiler feeds, also other animal feeds, such as layer or swine feed being part of more mixed-grain diets, are susceptible to the inhibitory activity of XIs. Nowadays, the situation is getting worse with all the raw material prices increasing and nutritionists tending to use other feed ingredients and locally produced cereals. They need a xylanase which is resistant to xylanase inhibitors.

Xylanases’ resistance to XIs is crucial – Axxess XY shows it

To prevent xylanases from losing their effect due to the presence of xylanase inhibitors, the resistance of new-generation xylanases to these substances is paramount in the development process, including enzyme discovery and engineering.

In the past 25 years, scientists have learned much about XI-encoding genes and discovered how xylanase inhibitors can block microbial xylanases. Additionally, there has been a significant increase in understanding the structural aspects of the interaction between xylanases and XIs, mainly how xylanase inhibitors interact with specific xylanases from fungi or bacteria and those in the GH10 or GH11 family. With such understanding, a new generation xylanase, Axxess XY, was developed. Besides showing the essential characteristics of intrinsic thermostability and versatile activity on both soluble and insoluble arabinoxylan, it is resistant to xylanase inhibitors.

Axxess XY takes xylanase application in animal feeds to the next level.

Axxess XY outperforms other xylanases on the market

Recent scientific developments (Fierens, 2007; Flatman et al., 2002; Debyser, 1999; Tundo et al., 2022; Chmelova, 2019) and internal research can be summarized as follows:

High InhibitoryFigure 1: Schematic summary of the susceptibility of different xylanase to xylanase inhibitors from three main groups.

The high resistance to xylanase inhibitors is one of the reasons that a novel xylanase with bacterial origin and from the GH-10 family was chosen to be Axxess XY. EWN innovation, together with research partners, made an interesting benchmark comparison between xylanases that are commercially sold by different global suppliers and Axxess XY. For these trials, all xylanase inhibitors from wheat were extracted. The inhibitors, together with the respective xylanase, were incubated at 400C (to mimic birds’ body temperature) for 30 mins. Then, the loss of xylanase activity was calculated by analyzing remaining activity after incubation. Results are shown below in Figure 2. There were varying levels of activity loss observed in the different commercially sold xylanases. In some xylanases, the losses were alarmingly high. However, Axxess XY was not inhibited at all.

GraphFig. 2: Extracted total xylanase inhibitors from wheat incubated with the respective xylanase at 40°C for 30 mins. – Loss of activity after incubation with xylanase inhibitors

Conclusion:

Xylanase inhibitors are present in all cereal grains and, unfortunately, heat tolerant (up to 900C, still 75% of inhibition activity was retained). Regardless of the diets used, there is a possibility that the xylanase used may come across xylanase inhibitors, resulting in a loss of activity. More importantly, this can lead to inconsistent performance.

For effective, consistent, and higher performance of NSP enzyme application, it is a must to use xylanase that is resistant to xylanase inhibitors.

Literature:

Chmelová, Daniela, Dominika Škulcová, and Miroslav Ondrejovic. “Microbial Xylanases and Their Inhibition by Specific Proteins in Cereals.” KVASNY PRUMYSL 65, no. 4 (2019). https://doi.org/10.18832/kp2019.65.127. LINK

Choquer, Mathias, Elisabeth Fournier, Caroline Kunz, Caroline Levis, Jean-Marc Pradier, Adeline Simon, and Muriel Viaud. “Botrytis CinereaVirulence Factors: New Insights into a Necrotrophic and Polyphageous Pathogen.” FEMS Microbiology Letters 277, no. 1 (2007): 1–10. https://doi.org/10.1111/j.1574-6968.2007.00930.x. LINK

Debyser, W, WJ Peumans, EJM Van Damme, and JA Delcour. “Triticum Aestivum Xylanase Inhibitor (Taxi), a New Class of Enzyme Inhibitor Affecting Breadmaking Performance.” Journal of Cereal Science 30, no. 1 (1999): 39–43. https://doi.org/10.1006/jcrs.1999.0272. LINK


Influence of nutrition and management on eggshell quality

LAYERS

Conference report

Many factors affect eggshell quality, such as nutrition, disease, genetics, environmental conditions, age of birds, stress, egg collection and handling, and packaging and transport. Eggshell quality, however, is primarily related to management and nutrition, not genetics or other factors. It is becoming a bigger issue as the length of the laying period has extended because, as hens get older, shell quality drops.

“The information in the genetics companies’ management guides is for direction and information only, as each egg producer’s production goals and conditions can vary”, says Vitor Arantes, Global Technical Services Manager and Global Nutritionist, Hy-Line International. He advises listening to your birds. For example, “diets should be aligned with the bird’s bodyweight development, rather than the age of birds and following feeding phases according to pre-planned timings for feed changes,” he noted.

Below are some of the nutritional factors impacting eggshell quality that producers should keep top of mind.

Early development and pre-starter diets

“Bodyweight at 6-12 weeks of age is key, but to achieve this goal, bodyweight up to 5 weeks of age is a MUST, stressed,” Dr. Arantes. “This critical period is an investment, so don’t be shy. Poor management in the first 5 weeks will delay production, increase mortality, and prevent the achievement of peak production targets. In turn, it will affect egg quality. Therefore, we must provide proper diets as soon as possible,” he said.

As shown below, chicks hatch with relatively underdeveloped internal organs and systems. During the first 5 weeks of age, the digestive tract and the immune system undergo much of their development. The development of the intestine is crucial for nutrient absorption and will determine a hen’s future production efficiency. Strong intestinal development will also strengthen the immune system and reduce the possibility of future enteric diseases and improve the response to vaccinations.

Multi-phasic body weight development during rearing and the start of lay

Pre-starter diets support the chicks’ transition from being fed by the yolk sac and are relatively high in energy, protein, and the vitamins and minerals required for growth and development. The chicks’ limited digestive capacity post-hatch demands easily digestible raw materials. A crumble containing high-quality, functional ingredients provides a good nutritional start in life. The use of feed additives, such as enzymes to improve digestibility, and synbiotics to aid in the early development of a microbial population and to prevent the intestinal colonization of pathogens, known as competitive exclusion, should be considered.

Teaching hens how to eat – preparing for the pre-peak phase

The objective is to develop sufficient feed intake capacity for the period start of lay, by feeding a developer diet from 10-16 weeks of age. This is a diluted diet with high levels of insoluble fiber to develop feed intake capacity (crop and gizzard).

“You can train pullets to eat by taking advantage of their natural feeding behavior,” commented Dr. Arantes “Because birds consume most of their feed before lights go off, the main feed distribution (60% of the daily ration) should be in the late afternoon, about 2-3 hours before ‘light off’. In the morning, birds will be hungry and finish the feed, including fine particles. Emptying feeders helps to prevent selective eating and will increase the uniformity of the flock. In the middle of the day, there should be no feed in feeders for 60-90 minutes,” he noted.

Don’t neglect the pre-lay phase

Start feeding a pre-lay diet when most pullets show reddening of the combs, which is a sign of sexual maturity. Feed for a maximum of 10–14 days before the point of lay. This is important to increase medullary bone calcium reserves. Large particle calcium should be introduced in this phase. Do not feed pre-lay later than the first egg as it contains insufficient calcium to support egg production.

There can be a negative impact on feed consumption from the sudden increase in dietary calcium levels from 1% to above 4% at the start of lay. Field experience indicates that the use of pre-lay diets helps as a smooth transition between the developer (low calcium and nutrient density) and the peaking diet. Correct feed formulation and matching diet density with consumption will minimize the impact of reduced calcification of bone over the laying cycle and extend the persistency of shell quality. It also helps to avoid the often-reduced appetite/daily feed intake during early production.

The following are suggested for pre-layer feed:

  • 1.25 to 1.40% P
  • 2.5% Ca (50% coarse limestone)
  • 900-1,100g per hen total
  • Never before 15 weeks of age
  • Never after 2% hen day (HD) egg production

Understand your limestone

Calcium particle size is important for eggshell quality. Fine calcium carbonate particles pass through the gastrointestinal tract in 2-3 hours, whereas particles above 2mm are retained in the gizzard and will slowly solubilize, delaying the calcium assimilation. Eggshell formation takes 12 to 14 hours and occurs mainly during the night period. Providing a high amount of large calcium particle size before the night, when birds are sleeping, will help laying hens to produce a strong eggshell.

The ratio of coarse to fine calcium particles will increase with bird age as below. Changing the particle size ensures that more calcium will be available at night from the diet instead of from the bone.

Calcium particle size recommendations

Particle size Starter, Grower, Developer Pre-Lay Weeks

17-37

Weeks

38-48

Weeks

49-62

Weeks

63+

Fine (<2mm) 100% 50% 40% 35% 30% 25%
Coarse (2-4mm) 50% 60% 55% 70% 75%


The solubility of limestone may differ according to the source. Calcium with high solubility will not be stored for a long time in the gizzard, negating the particle size effect. Dietary calcium levels may need to be adjusted based on the solubility of your limestone. The in vitro solubility of your limestone source can easily be checked on the farm, with a simple technique using hydrochloric acid. The target is to recover 3-6% of the supplemented limestone.

Water

It’s impossible to have good eggshell quality if you don’t have good water intake and good quality water. For example, excessive salt levels in drinking water can cause persistent damage to shell quality.

Conclusion: invest in the rearing phase

Good nutrition and management practices are key to good shell quality. The rearing period is a key developmental time for future success during the laying period – it is an investment phase.

***

EW Nutrition’s Poultry Academy took place in Jakarta and Manila in early September 2023. Vitor Arantes, Global Technical Services Manager and Global Nutritionist, Hy-Line International, was a distinguished guest speaker in this event.


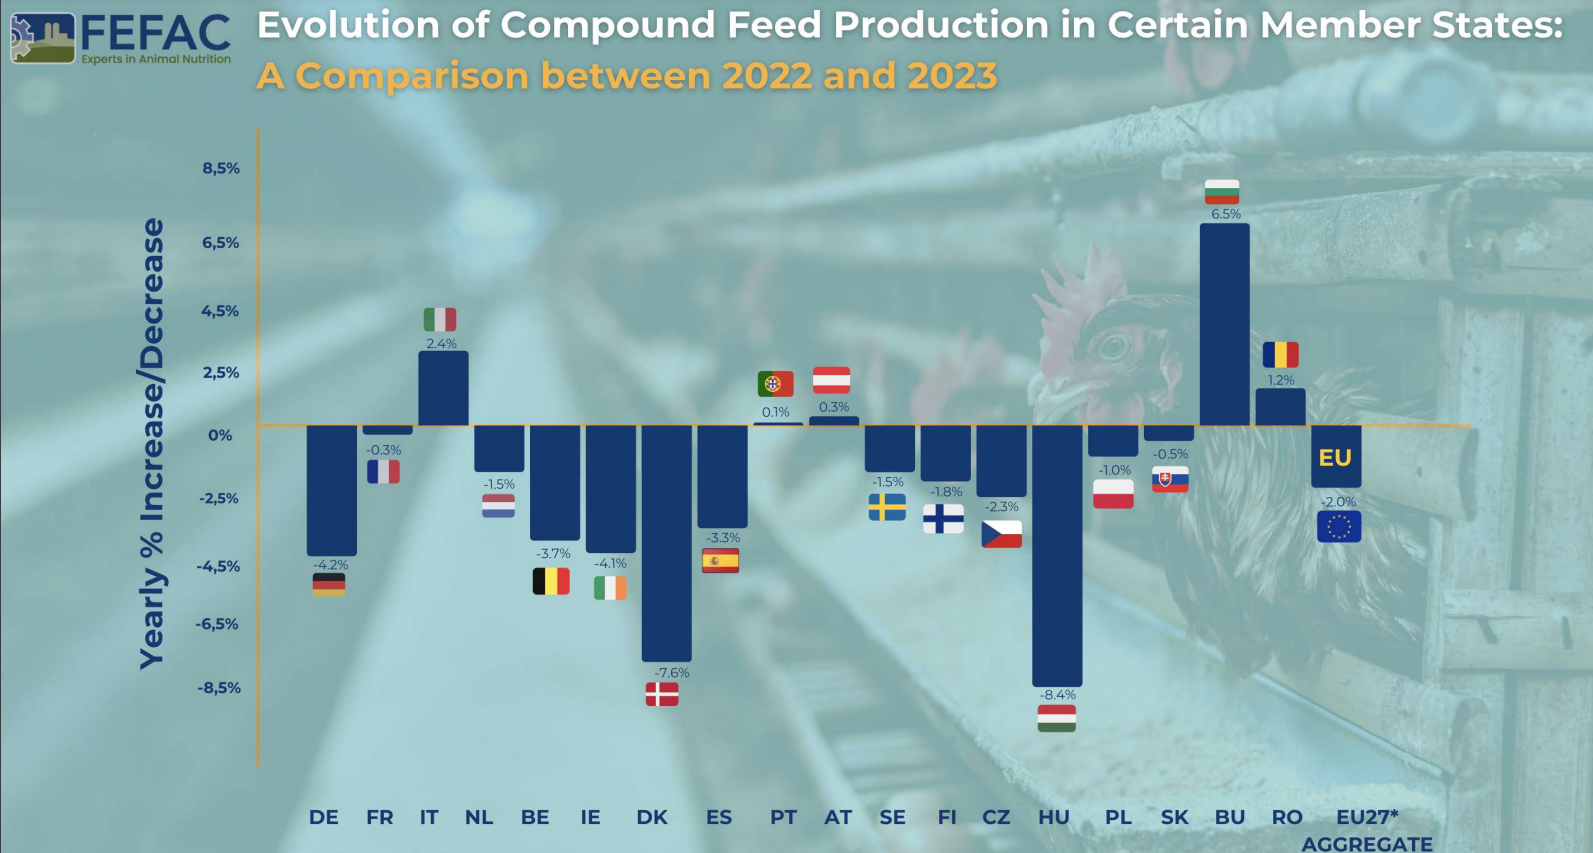
FEFAC: Quick Overview of 2023 EU Compound Feed Production

Total Production 2023: 144.3 million metric tons for farmed animals

Change from 2022: 2% decrease

Factors Influencing Decrease

Political and Market Pressures: Addressing crises and the shift towards sustainable feed.

Climate and Diseases: Effects of droughts, floods, Avian Influenza (AI), and African Swine Fever (ASF) on raw material supply and animal production.

National Policies: Initiatives for greenhouse gas and nitrate emission reduction.

Consumer Trends: Food price inflation impacting demand.

Production Variability: Different trends across EU Member States, with notable decreases in countries like Germany, Ireland, Denmark, and Hungary, and slight increases in Austria, Bulgaria, Italy, and Romania.

Sector-Specific Trends

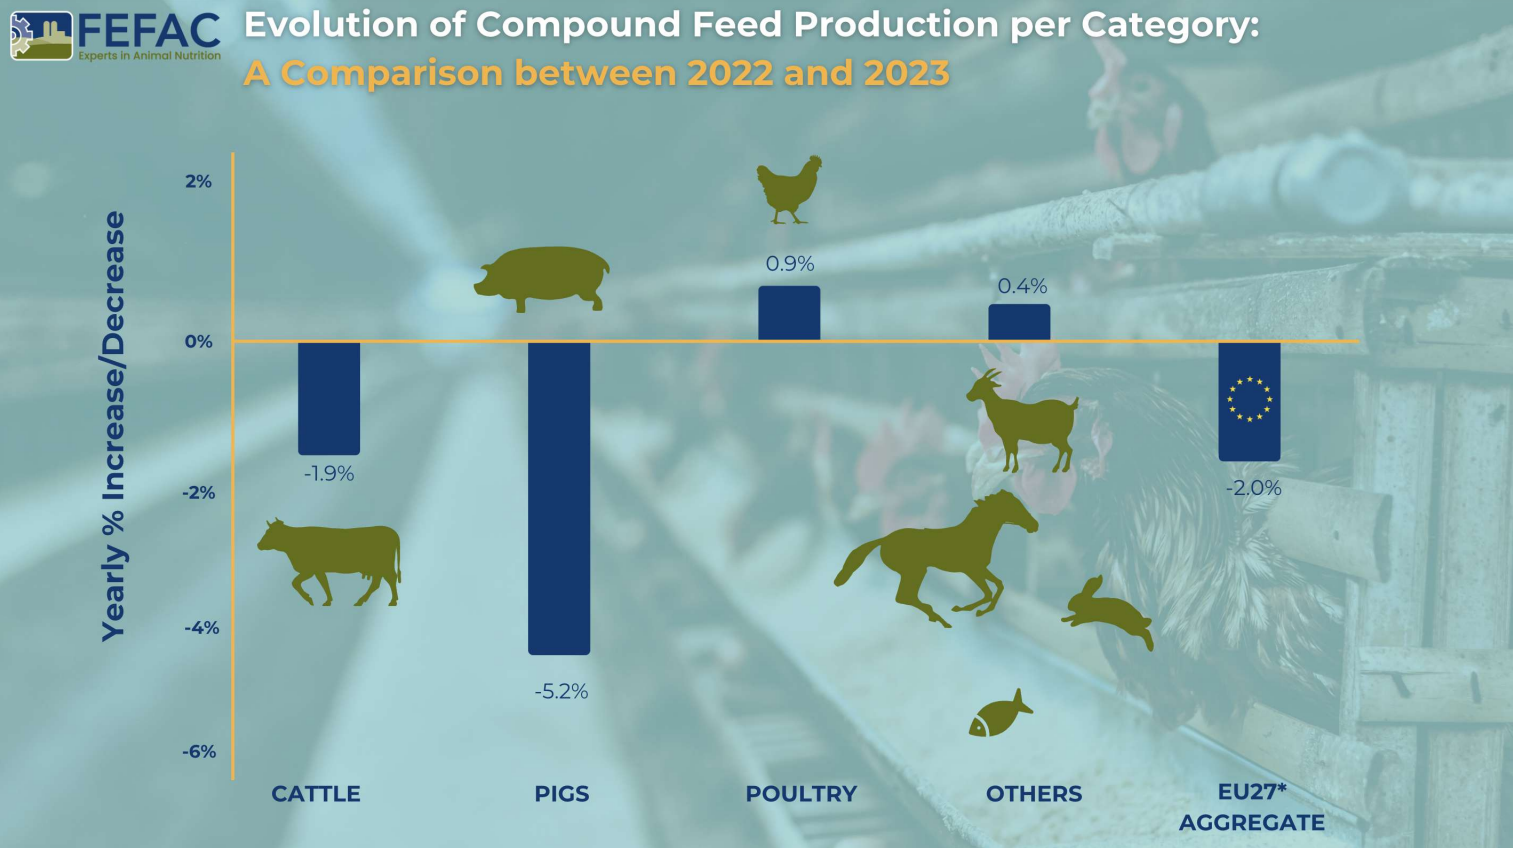
By Species
By Species

Pig Feed: Major decline of nearly 2.5 million tons. Key challenges included:

  • Loss of export markets, particularly in Asia
  • Negative media impact in Germany
  • Significant production drop in Denmark (-13.6%) and Spain (loss of 800,000 metric tons)
  • Italy’s ongoing struggle with ASF

Poultry Feed: Increase by 0.9 million tons, yet still 700,000 metric tons below 2021 levels. Challenges included declines in Hungary and Czechia due to reduced broiler production.

Cattle Feed: Decrease of 0.8 million tons from 2022.

2024 key factors

  • Animal disease
  • Economic instability, persistent food price inflation
  • Weather irregularities
  • Continued imports of poultry meat from Ukraine
  • “Green and animal welfare” policies affecting local production

Summary

The EU’s compound feed production in 2023 faced numerous challenges, leading to an overall decrease. The pig feed sector was most severely hit, while poultry feed showed some recovery. The influence of environmental, economic, and policy factors played a significant role in shaping these trends. Despite the price of feed cereals falling back to the levels seen before Russia’s invasion of Ukraine, these challenges will continue to be felt in 2024.


Source: FEFAC


Optimizing DOC quality, part 1: The breeder perspective

Conference report

In the Poultry Academy held by EW Nutrition in the fall of last year, Judy Robberts, Technical Service Manager, Aviagen, explained that the success of a breeder flock depends on producing good quality hatching eggs with high hatchability and delivering first quality chicks. With this in mind, we have to ask two essential questions: What impact does the breeder farm have on chick quality? And What are the most overlooked areas for breeders?

Nest box hygiene

Nest

Nest

Nest box hygiene is key to good quality hatching eggs. Shortly after egg deposition, the eggshell is moist, and the cuticle is not yet an effective protection. In addition, during this period the egg is cooling down from the hen’s body temperature (41°C) to house temperature. Due to this process of cooling down, the content of the egg contracts and a vacuum is created in the egg. In compensation, air enters and forms the air cell. Together with this air, bacteria can easily penetrate the egg. For this reason, it is very important that only hatching eggs are used which have been laid in a clean nest.

Maintaining a hygienic nest environment with routine cleaning of the nest mat or frequently replacing the bedding material will reduce the risk of bacterial contamination.

Clean nests and nesting equipment are essential to avoiding contamination.

Egg collection and pick-up schedule

Collect nest eggs a minimum of 4 times a day, more frequently in hot weather, as eggs cannot cool down sufficiently in the house to interrupt embryonic development. Adjust the exact timing so that no more than 30% (any more will increase the incidence of cracked eggs) of the eggs fall in any one collection. When determining collection times, it is important to remember:

  • The majority of eggs will be laid in the morning, and collection intervals should be managed accordingly.
  • Eggs left in the nest or on belts longer than recommended will have an increased incidence of being cracked or soiled.
  • Transition points on belts need to be smooth so eggs don’t pile up and bump into each other.
  • Never leave eggs overnight in the nests or belts.
  • Eggs left in conventional nests are subject to toe pecks or soiling from other hens.
  • Floor eggs (eggs that were laid outside of the breeder flock’s next boxes) should be collected more often than nest eggs.

It is not advisable to collect eggs in cardboard egg trays/flats, as the fiber material absorbs egg heat, and it takes longer for them to cool down. Because the fiber trays are porous, they can also harbor unwanted organisms/bacteria/fungi and attract vermin.

Ideally hatching eggs should weigh a minimum of 50 g from a flock at least 22 weeks of age. Smaller eggs from younger flocks may be used, however, chick size and early livability will not be optimum. Remember that a chick will yield approximately 68% of the egg size. Therefore, a small egg will produce a small chick.

Egg cleanliness

Always wash hands after collecting floor eggs and before each collection of nest eggs. Floor eggs should not be placed in the nest box – even if they appear clean. Washing floor and dirty eggs removes the eggs protective coating. Always remember, a washed egg is still a dirty egg, but a clean egg is one that was never dirty.

Eggs should be treated with chemical-based antimicrobials, as scraping, rubbing, or washing the eggshell will damage the cuticle and remove the physical and antimicrobial barrier. Since the eggshell permeability increases after 24 hours and makes the eggs more susceptible to bacterial invasion, eggs should be sanitized as soon as possible. The most popular method is fogging as it is safe, the fog reaches all the eggs and the eggs do not get wet.

Floor eggs are not hatching eggs

Floor Eggs

The hatchery cannot fix mistakes from the breeder farm. Therefore, it is NOT recommended to set floor eggs – eggs that were laid outside of the breeder flock’s next boxes. Floor eggs have a higher bacterial load than nest eggs and consequently lower hatchability. They are also potential ‘bangers, or exploders’ and can cross-contaminate other eggs, especially in the same incubator.

Selection of floor eggs must be done at the farm, so that a dirty egg never enters the hatchery. Where strictly necessary, set floor or dirty eggs only if the disadvantages of setting these eggs are fully understood and accepted by the hatchery. If floor eggs are used for hatching, they should be clearly marked and stored separately from the nest eggs so that the hatchery can manage the contamination risk appropriately.

Floor eggs have a significantly higher risk of microbial contamination that will reduce hatch and chick quality.

Egg hygiene – bacterial contamination

Egg condition Total Bacteria (cm2)
Newly laid 300
Cooled clean egg 3,000
“Clean” floor egg 30,000
Dirty egg 300,000

Monitor the number of floor eggs and adjust management practices to minimize them. Floor eggs are a problem that should be tackled at the breeder level, with good breeder management and suitable housing equipment. If levels of floor eggs exceed 2-3% across the life of the flock, there is a problem. Floor eggs will be much higher at the start of production, but by peak production should be down to 1-2%.

Cracked eggs

Eggs with cracks are more likely to become infected and have low hatchability and poor chick quality.

Influence of eggshell crack types on hatchability and chick quality

Treatment Egg weight at transfer (g) Weight loss (%) Fertility (%) Hatchability (%) Chick weight (g) Chick uniformity (%)
Normal 62.0a 11.4c 97.8a 83.9a 48.9a 82.6
Star cracks 55.6b 20.7b 89.4b 49.4b 48.2a 70.3
Hairline cracks 53.1c 24.0a 83.3c 30.0c 45.6b 70.2

Khabisi et al., 2011  a-c Means within a column without a common superscript differ significantly (p ≤ 0.05)

Do not set cracked eggs. Record the number of eggs with cracks, and if the frequency is unsatisfactory, investigate and eliminate possible causes.

On-farm egg storage rooms

Don’t forget that storage starts from the time of laying, not the time of receival at the hatchery.

Eggs need to be cooled below 24oC (threshold temperature or physiological zero) as soon as possible to stop cellular growth of the embryo, until the egg is set at the hatchery. This minimizes embryo mortality, maximizes hatchability and helps to ensure chick quality. Eggs should be stored within 4 hours after collection.

On breeder farms, eggs are usually stored until being transported to the hatchery. The storage duration depends on the egg room capacity, supply of hatching eggs, hatchery capacity, and demand for day-old chicks. Don’t forget that storage starts from the time of laying, not the time of receival at the hatchery.

If the farm has an environmentally controlled egg storage room, eggs can be collected by the hatchery at least twice a week. If the farm has no dedicated egg storage room, eggs must be transported to the hatchery daily. Uncontrolled fluctuations in egg storage temperatures will cause stop-start growth of the germinal disc, which will reduce hatchability.

The temperature of the farm egg storage room should higher than the egg transport truck and the egg transport truck temperature should be higher than the hatchery egg storage room. This consistent decrease in temperature is to prevent condensation (also referred to as sweating) on the eggs. Condensation on the eggshell impairs the natural mechanisms of defense and provide an ideal environment for bacteria grow, penetrate the shell, and contaminate the egg. Condensation on eggs is more common in hot and humid climates common throughout Asia.

Egg storage rooms are important, yet they are frequently overlooked. Areas to consider include:

  • Consistent temperature 24/7 (insulation will minimize variation),
  • Temperature alarm system – set for a maximum temperature of 21°C and a minimum of 16-18 °C,
  • Temperature and humidity sensor placement – don’t place in a direct line of temperature or humidity sources as this will lead to false readings,
  • Do not place sensors against walls,
  • Sensor accuracy (loggers are recommended),
  • Fans to evenly distribute air,
  • Do not place eggs directly against the wall or on the floor in the storage room to maximize air circulation and to ensure uniform conditions, and
  • Avoid direct air flow onto eggs from fans, room coolers and/or humidifiers, as this can increase moisture loss and cause temperature variation throughout the room.

The farm is the starting point to ensure chick quality. Attention to detail and hygiene throughout the whole process is critical. Through monitoring and auditing, areas with deficiencies can be identified and corrected to continue producing high quality hatching eggs.


Optimizing DOC quality, part 2: The hatchery perspective

CHICKS

Conference report

At EW Nutrition’s Poultry Academy in the fall of last year, Judy Robberts, Technical Service Manager, Aviagen discussed the impact of the hatchery on chick quality. The transportation and storage of hatching eggs, preventative maintenance, and day-old chick transport all play an essential role. If mismanaged, these areas can negate the benefits of money spent and improvements made at the breeder farm or even in the hatchery itself.

Egg transport from breeder farm to hatchery

The transportation of hatching eggs from the breeder farm to the hatchery is critical: clean and disinfect the truck prior to use, to prevent pathogen spread, and only use a truck that is dedicated to transport hatching eggs. Always transport eggs small end down to avoid loose air cells.

The temperature of the farm egg storage room should higher than the egg transport truck. This decrease in temperature is to prevent condensation (also referred to as sweating) on the eggs. Condensation on the eggshell impairs the natural mechanisms of defense and provide an ideal environment for bacteria grow, penetrate the shell, and contaminate the egg. Condensation on eggs is more common in hot and humid climates common throughout Asia. Even when on-farm egg storage and truck temperatures are equal, sweating can still occur during loading and unloading, especially on warm and humid days. In such a case, a higher on-farm storage temperature of 23°C instead of the generally recommended 18-20°C can be considered.

Avoid sudden temperature changes. Use temperature loggers during transport to record any temperature fluctuations. Take internal egg temperatures at different locations within each batch received at the hatchery, to check temperature conditions during transport. The relative humidity of the truck should be set at 65-70%.

Egg storage at the hatchery

Don’t forget that storage starts from the time of laying, not the time of receival at the hatchery. Egg storage rooms are important, yet they are frequently overlooked. Areas to consider include:

  • Consistent temperature 24/7 (insulation and fans will minimize variation),
  • Avoid condensation,
  • Do not place eggs directly against the wall or on the floor in the storage room, to maximize air circulation and to ensure uniform conditions,
  • Alarm systems – set for a maximum temperature of 21°C and a minimum of 16-18°C,
  • Sensor accuracy (loggers are recommended), and
  • Sensor placement – don’t place in a direct line of temperature or humidity sources as this will lead to false readings. Similarly, allow for air circulation, do not place sensors against walls.

Temperature and storage time

Hatchery

“The holding temperature should be based on storage time,” advised Ms Robberts. Eggs which are set within 4 days of lay don’t need to be kept at a temperature below 20°C; in this case 21–22°C is regarded as optimal. This relatively high temperature promotes the thinning of the albumen, which improves the gas exchange during early incubation. On the other hand, it is low enough to maintain the vitality of the embryo. Best hatches result from eggs 3–7 days of age. Storage for longer than 7 days will require cooler temperatures to help reduce the loss of hatch due to embryo cell death and decline in internal egg quality. If the storage period is less than 7 days a storage temperature of 16-18°C is advised and if the storage period is longer, a temperature of 10-12°C is mostly recommended. The eggs of young breeder flocks are better suited for prolonged storage periods than eggs of older breeder flocks, as albumen quality in eggs of younger breeder flocks is higher.

Differences in temperature will result in the eggs reaching incubation temperature at different times and, therefore, hatching at different times, increasing the hatch window.

Relative humidity

The egg storage room should have a relative humidity of 70-80% to prevent egg dehydration and to maintain internal egg quality. The humidity should be a fine mist, so the eggs do not get wet. Humidifiers should be maintained and cleaned regularly. Dirty humidifiers can be a significant source of bacteria and lead to egg contamination. Follow the same guidelines for trolley placement, spacing, and air circulation in the hatching storage room as the farm egg storage room. Likewise, the same recommendations apply for thermometer monitoring and placement.

Don’t forget the maintenance

Maintenance is often reactive, not preventative – things are only fixed when they break down. This can compromise hatchability and chick quality. A few things to consider when setting up a maintenance plan are:

  • Have a dedicated person responsible for maintenance reporting to the hatchery manager,
  • Produce a list of all the equipment to be maintained including frequencies,
  • Keep records on all performed maintenance,
  • Maintenance includes calibration of equipment,
  • Keep track of spare parts on hand, and
  • Include the building structure and ancillary equipment in the program.

Day-old chick transport

HatcheryTransport cannot improve the quality of the day-old chick, but it can certainly harm the chick’s welfare, growth, development and performance.

If chicks are transported outside their thermoneutral zone (32-35oC) they will start using up the nutrients from the yolk sac at a much faster rate to maintain their core temperature (40-41°C) . A core temperature above 41°C post-hatch will lead to panting resulting to water loss with the risk of dehydration and below 39.5°C will lead to reduced activity and low feed consumption. Adjust the number of chicks per box if optimal temperature inside the chick boxes cannot be achieved due to limitations in transport equipment.

Optimizing transport conditions for day-old chicks from hatchery to farm for is beneficial for subsequent performance.

Conclusion

The modern hatchery is a major investment, so it just makes sense to pay attention to detail to maintain hatching egg quality and produce high-quality chicks. Factors such as egg storage conditions, play a significant role in achieving maximum hatchability. Through monitoring and auditing, areas with deficiencies can be identified and corrected to continue producing high quality hatching eggs. The transport of day–old chicks from should ensure that the birds arrive at the farm in the same condition in which they left the hatchery.


Getting broilers off to a good start: House preparation

Temporary guards to confine chicks

Conference report

At the recent EW Nutrition Poultry Academy, Judy Robberts, Technical Service Manager, Aviagen discussed the management of broilers for growth & production efficiency. She noted that the first 7 days is the most critical period in the life of a broiler chicken. “In this period chicks are the most efficient at converting feed to weight, however, its digestive and immune systems are still immature, so you want to get your chicks off to the best possible start,” she said.

“Seven-day weights are a key KPI of the success of brooder management – chicks should weigh at least 4 times their initial body weight. Also, each 1 gram of bodyweight at 7-days of age is equivalent to 10 grams at 35-days.The goal of management during the first week is to ensure that chicks consume enough feed and water because chick weight at 7 days of age is strongly correlated to final body weight at slaughter,” noted Ms. Roberts.

To ensure chicks got off to the best start, her presentation included 6 essential factors for house preparation and brooder set-up for the successful placement of chicks:

Planning

Planning should start well before chicks arrive on farm. The expected delivery date, time and number of chicks should be established with the supplier well in advance of chick placement. It is impossible to do the best possible chick placement if you do not know what you are going to receive, at least several days in advance. For example, the age and vaccination status of the donor flock. This will ensure that the appropriate brooding set-up is in place and that the chicks can be unloaded and placed as quickly as possible.

Chick placements should be planned so that chicks from different aged donor flocks can be brooded separately. Chicks from young donor flocks will achieve target body weights more easily if kept separate until the time of grading at 28 days of age.

Also, is the capacity of the equipment, such as feeders, drinkers, water pressure etc., capable of meeting the needs of the number of chicks to be placed? Do you have necessary supplies, such as chick paper, on hand?

Equipment test

  • After cleaning and disinfection is completed, check that all water, feed, heat, ventilation, and lighting equipment is fully functioning and properly, adjusted for the needs of day-old chicks before the chicks arrive. Heaters should be checked and serviced before starting pre-heating.

Litter and pre-heating

Chicks do not have the ability to regulate body temperature for the first 5 days and are not able to fully control their body temperature until about 14 days of age. They quickly become chilled if placed on cold litter, which hinders their search for feed and water. In case of floor rearing, bring in the litter after preheating the floor for at least 24 hours (commencing from when the floor is dry and depending on heater type and capacity, season and building insulation) before chicks arrive to allow the litter to reach 28-30°C. Floor temperature is more important than air temperature because chicks are in contact with litter via bare feet. If the floor is cold, chicks lose body heat to the floor through their feet and through their body when they sit down. Measure temperatures throughout the brooding area with a digital on the litter surface and approximately 2 cm above the litter, as this is where the chicks will be placed.

Litter should be evenly spread, and at least 5cm deep to provide adequate insulation from cold house floors. Air temperature will rise rapidly after the heat is turned on, but it takes much longer to thoroughly warm the mass of litter on the floor. Litter should have good moisture absorption and water holding capacity. Uneven litter can restrict access to feed and water and may lead to a loss in uniformity.

Preheating can ensure that the litter is properly dried prior to placement to reduce bacterial growth and ammonia production.

Brooding area set-up

Allow an initial chick stocking density of 40-50 chicks/m2, do not give excess of floor space. The size of the brooding area will also be determined by the output of the heat source.

Light intensity should be30-40 lux, uniform and continuous for the first 48 hours to ensure chicks find food and water.

The use of a brooder guard is recommended for the first 5-7 days to confine chicks to near the heat source. The guard should be about 50 cm high. If made of solid material, such as cardboard, it can also protect the chicks from drafts. Brooders should be 2 m away from brooder edge.

Spot Brooder
Example of spot brooder layout

Temporary guards to confine chicks

Minimum ventilation set-up

Ventilation distributes heat evenly throughout the house and maintains optimum air quality in the brooding area. Minimum ventilation should begin with house preheating 24-48 hours prior to placement to remove waste gases and excess moisture.

Target that 24 hours before chicks arrive to achieve 28-30oC air and floor temperature, and relative humidity should be 60-70% when chicks enter the house to prevent dehydration. Humidity exceeding 70% limits the amount of evaporation, causing wet litter and excessive litter caking.

Young birds are very susceptible to drafts, so air speed in the brooding area (at chick level) should be less than 0.15m/second.

  • Allow enough air exchange with a minimum ventilation rate at placement of 0.09m3/hour. Use a 5 minute fan cycle (with a thermostat override) – 30-45 seconds on.
  • Make sure temperature and humidity sensors are placed correctly. For spot brooding, 2 meters away from the edge of each brooder, and for whole-house brooding at the center and two additional sensors at the end wall of the house. Sensors should not in contact with birds and out of direct lines with heating system.

Feed and water supply

Starter feed should be ordered to ensure delivery 1-2 days before chick placement.

Once the chicks arrive, they need to begin drinking and eating as soon as possible. Poor quality crumble or pellets will result in reduced feed intake and poor performance. Feed distribution should minimize the physical deterioration in crumble and pellets. The amount of fine particles (<1 mm) in sieved crumbles or mini-pellet should be below 10%.

Turn on the mechanical feeding system and ensure all pans or chain feeders are filled. Automatic pan feeders should be buried into the litter, so chicks can easily access them.

Spread a thin layer of starter feed onto chick paper to cover at least 80% of the paper area and fill any feeder trays 1-2 hours prior to chick arrival to prevent feed and water from becoming too hot. At least 20-30% of the total feed offered should be placed on paper. Paper should be positioned alongside the automated feed and drinking systems to aid in the transition from temporary to automated systems. Replenish feed on paper in small amounts given frequently. At placement, chicks should be placed directly onto paper, so that feed is immediately found.

If using paper, the feed area should cover at least 80% of the brooding area (avoid drinkers and feeders)

Papered Feed Area
Papered Feed Area

Never place supplemental feed or water directly under or near brooders. Ensure that supplementary feed never runs empty and always remains fresh.

Water is the most immediate need when chicks arrive at the house because they can easily dehydrate during hatching, processing, and transport to the farm. Chicks must have unlimited access to clean and fresh water (18-21°C). Cold water will chill the chicks.

  • Flush drinkers 2-3 times to remove any remaining disinfectant. Remove dust and litter from cups. Adjust drinker line height to bird’s eye level. Ensure the placement of supplementary drinkers and feeders allows easy access for chicks and workers.

At placement, lower nipple drinkers to the chick’s eye level with sufficient water pressure to produce a droplet of water suspended from the nipple without dripping

Droplet Drinking
Droplet Drinking

Ms. Robberts concluded that “if house preparation is done properly then chicks are ready for a good start.” If there is any delay, it is always better that the chicks waits inside the truck (if its environmentally controlled) rather than getting cold waiting in the house. Chicks cannot become cold or heat stressed!”